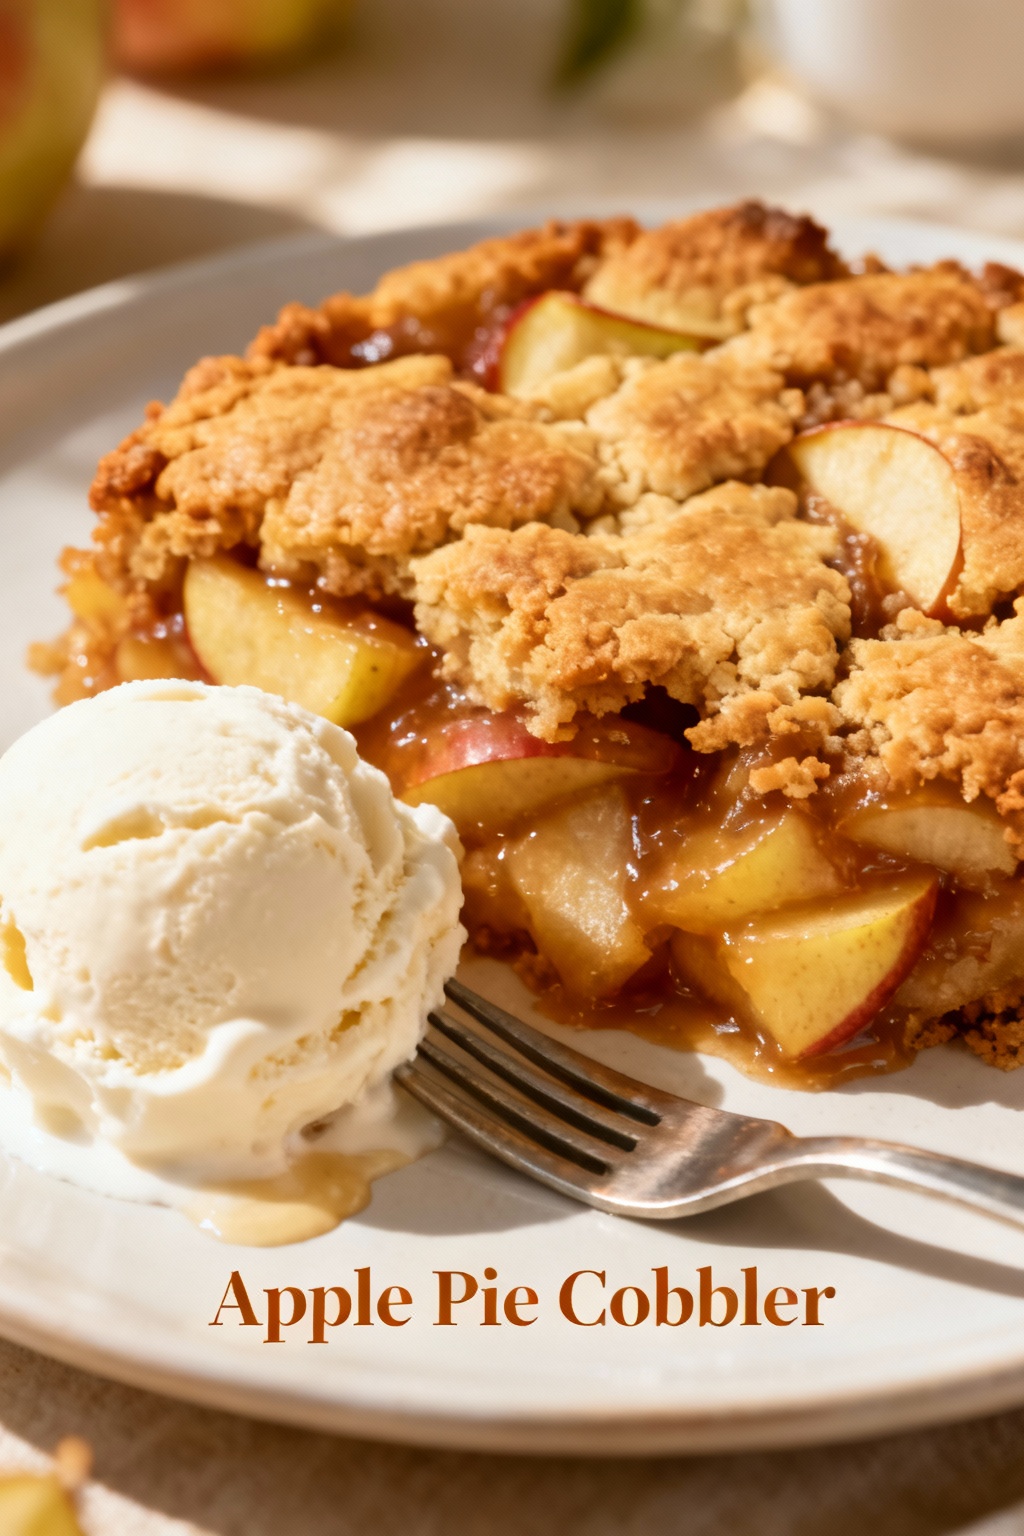
Apple Pie Cobbler
Introduction
Could your favorite apple pie flavor be captured in a lighter, faster apple pie cobbler that takes less time than a traditional pie yet delivers the same nostalgic crunch, gooey filling, and buttery aroma? Data from home-baking trends shows many home cooks want convenience—over 60% search for “quick apple desserts”—so this recipe is designed to give you classic pie taste in a cobbler that’s simpler to assemble and often ready 20–30% faster than a full double-crust pie. Read on for a sensory, step-by-step guide tailored to your kitchen, with practical swaps, nutrition insights, and pro tips to make this apple pie cobbler sing.
Ingredients List
6 cups apples (about 6 medium; Granny Smith, Honeycrisp, or a mix) — tart-sweet balance works best; substitute all-farm Macintosh for softer, juicier results.
1/2 cup granulated sugar (or 1/3 cup coconut sugar for a less-processed option).
1/4 cup brown sugar, packed (use maple syrup 3 tbsp if you prefer liquid sweetener).
2 tbsp lemon juice (balances sweetness and prevents browning).
2 tsp ground cinnamon plus 1/4 tsp nutmeg (or 2 tsp apple pie spice for convenience).
2 tbsp cornstarch or 3 tbsp tapioca starch (for thicker filling; arrowroot is a good gluten-free option).
Pinch of salt.
1 tsp vanilla extract.
Topping:
1 cup all-purpose flour (or 3/4 cup oat flour + 1/4 cup almond flour for gluten-free).
1/3 cup cold unsalted butter, cubed (or vegan butter/coconut oil soft for dairy-free).
1/3 cup granulated sugar (or 1/4 cup coconut sugar).
1 tsp baking powder.
1/4 tsp salt.
2/3 cup milk (dairy or plant-based such as almond or oat).
Optional: 1/2 cup rolled oats or chopped pecans for extra crunch.
Sensory notes: choose crisp, aromatic apples (Honeycrisp for perfume; Granny Smith for bright tartness). Butter gives a short, flaky topping; using yogurt or applesauce changes texture and reduces fat.
Timing
Preparation time: 25 minutes. Baking time: 35–40 minutes. Resting time: 10–15 minutes. Total active time: ~90 minutes from start to finish (including cooling), which is about 20% less than a typical double-crust apple pie that averages 110–120 minutes. If you use pre-sliced apples or a store-bought crust substitute, you can shave off another 10–15 minutes, making this an excellent weeknight or last-minute dessert.
Step 1: Preheat and Prep
Preheat oven to 375°F (190°C). Lightly butter a 9×13 or 8-inch square baking dish. Prepare a small bowl for the filling and a larger bowl for the topping. Tip: If you prefer a deeper filling, use a smaller dish; baking time may increase by 5–10 minutes. Line a rimmed baking sheet under the dish if your filling bubbles over.
Step 2: Slice and Flavor the Apples
Peel (optional) and core apples, slicing them into 1/4-inch thick wedges. Toss immediately with lemon juice to prevent browning. Add both sugars, cinnamon, nutmeg, cornstarch, salt, and vanilla; stir until evenly coated. Actionable trick: taste a raw slice after sugar coating—if it’s too tart, add 1–2 tbsp more brown sugar; if too sweet, a squeeze more lemon brightens the profile.
Step 3: Build the Filling Layer
Spread the apple mixture into the prepared dish in an even layer, pressing slightly so juices begin to mingle with the starch. For extra depth, add a tablespoon of cold butter dotted over the apples before topping. For a glossier finish, brush the top with a thin slurry of egg wash (1 beaten egg + 1 tbsp milk) during the last 10 minutes of baking.
Step 4: Make the Cobbler Topping
In a bowl, whisk flour, sugar, baking powder, and salt. Cut in cold butter with a pastry cutter, two forks, or your fingertips until the mixture resembles coarse crumbs. Stir in milk until a soft, slightly sticky dough forms. If using oats or nuts, fold them into the dough. Pro tip: cold butter is key for a crumbly, biscuit-like top; warm butter yields a denser crust.
Step 5: Assemble and Bake
Spoon or drop the topping over the apples in large dollops, leaving small gaps so steam can escape and juices can bubble up, creating a golden, slightly rustic finish. Bake at 375°F (190°C) for 35–40 minutes until the topping is golden and the filling is bubbling at the edges. If the topping browns too quickly, tent with foil after 20 minutes.
Step 6: Rest, Plate, and Serve
Let the cobbler rest 10–15 minutes to set the filling—this prevents a runny serving and helps flavors meld. Serve warm with vanilla ice cream, a dollop of lightly sweetened whipped cream, or a drizzle of salted caramel. For a lighter finish, serve with plain Greek yogurt and a sprinkle of toasted almond slivers.
Nutritional Information
Estimated per-serving (8 servings) values—these are approximations based on typical ingredient databases and will vary with swaps: Calories: ~340 kcal; Total fat: 12 g; Saturated fat: 6 g; Carbohydrates: 54 g; Fiber: 3.5 g; Sugars: 32 g; Protein: 3.5 g; Sodium: 160 mg. Data insight: apples provide fiber (soluble pectin) and vitamin C, while the topping contributes most of the saturated fat and calories—swapping ingredients can significantly change totals (e.g., replacing butter with applesauce can lower calories by ~15–20% per serving). If you need exact macros, weigh final portions and use a nutrition calculator to reflect your ingredient brands.
Healthier Alternatives for the Recipe
Reduce sugar: replace half the granulated sugar with 1:1 stevia blend or use 1/3 cup maple syrup (reduce added liquid in topping by 1–2 tbsp). Lower fat: swap half the butter in the topping for unsweetened applesauce or mashed banana (expect a softer texture). Gluten-free: use a 1:1 gluten-free flour blend and certified gluten-free oats. Vegan: use plant butter and almond milk; use a flax “egg” (1 tbsp ground flax + 3 tbsp water) if you want a richer binder. Diabetic-friendly: pick tart apples, use erythritol or monk fruit to keep glycemic load lower, and serve smaller portions with protein like Greek yogurt to reduce post-meal glucose spikes.
Serving Suggestions
Classic: warm with vanilla bean ice cream and a dusting of cinnamon. Cozy breakfast: serve a spoonful over plain Greek yogurt with crushed pecans and a drizzle of maple. Elegant dinner: pair a small portion with salted caramel and a late-harvest Riesling or Gewürztraminer—fruit-forward wines complement the apple spice. Casual: stack leftovers between toasted brioche for a quick “cobbler sandwich” with a smear of mascarpone. Personal tip: add a few slices of sharp cheddar on the side—the sweet-savory combo is a New England favorite that highlights apple complexity.
Common Mistakes to Avoid
Using only sweet apples: leads to cloying filling—mix tart and sweet varieties for balance. Over-slicing apples too thin: results in mushy texture—keep slices about 1/4 inch. Skimping on thickener: causes a runny filling—measure starch carefully, especially with very juicy apples. Warm butter in topping: yields a flat, greasy crumb—work with cold butter for flakiness. Baking at incorrect temp: too low = soggy topping; too high = browned top with raw center—use an oven thermometer for accuracy.
Storing Tips for the Recipe
Cool completely before covering: store in an airtight container in the refrigerator for up to 4 days. To freeze: fully cool, wrap tightly in plastic wrap and aluminum foil, or place in a freezer-safe container for up to 3 months. Thaw overnight in the refrigerator, then reheat at 350°F (175°C) for 10–15 minutes to revive the topping, or microwave individual portions for 45–90 seconds if short on time. Make-ahead: prepare filling and refrigerate for up to 24 hours; make topping just before baking for best texture.
Conclusion
This apple pie cobbler delivers the familiar flavors of apple pie with faster assembly, fewer fiddly steps, and flexible swaps to suit dietary needs. The approach balances tart and sweet apples, a spiced, thickened filling, and a buttery biscuit-like topping that crisps beautifully in the oven. Try the recipe this weekend, snap a photo, and share how you customized it—did you go vegan, reduced-sugar, or add pecans? Leave a comment with your tweak and come back for more seasonal desserts and smart baking tips.
FAQs
Q: Can I use frozen apples? A: Yes—thaw and drain excess liquid first; you may need an extra tablespoon of cornstarch to account for released water. Q: How do I know when the cobbler is done? A: The filling should bubble at the edges and the topping should be golden; an inserted knife into the center should meet softened apples. Q: Can I make this gluten-free? A: Swap a 1:1 gluten-free flour blend and use certified gluten-free oats—texture may be slightly different but very tasty. Q: How do I reheat leftovers to keep the topping crisp? A: Reheat in a 350°F oven for 10–15 minutes uncovered; for single servings, use a toaster oven. Q: Is this recipe suitable for diabetics? A: With sugar substitutes (erythritol/monk fruit), smaller portions, and pairing with protein, it can fit into a moderated diabetic meal plan—consult your dietitian for personalized advice.