Little Debbie Snowball Truffles
Introduction
Can a Little Debbie Snowball be transformed into a bakery-quality truffle that delivers the same pillowy marshmallow, chocolate, and coconut experience using just a few pantry staples and under 75 minutes? This recipe leverages a simple copycat approach many home bakers use to remix snack cakes into bite-sized truffles—combining texture science (crumb + binder = cohesive truffle) with quick chilling and high-quality coating for maximum flavor payoff.
Ingredients List
– 8 Little Debbie Snowballs (or 12 small Snowball-style snack cakes) — crumbled into fine crumbs; substitute: 12 graham crackers + 4 tbsp marshmallow creme for a Snowball-like base.
– 4 oz cream cheese, softened (room temperature) — alternative: mascarpone or dairy-free cream cheese.
– 1/2 cup powdered sugar, sifted — alternative: powdered erythritol for reduced sugar.
– 8 oz semi-sweet or dark chocolate (for dipping) — substitute: white chocolate or vegan chocolate.
– 1 1/2 cups sweetened shredded coconut, lightly toasted — substitute: unsweetened shredded coconut for lower sugar or finely crushed freeze-dried coconut for intense flavor.
– Optional mix-ins: 2 tbsp peanut butter, 1 tsp vanilla extract, pinch of sea salt, 1–2 tbsp mini chocolate chips.
Sensory notes: the snowball crumbs provide a cakey, marshmallow-sweet baseline; cream cheese adds tang and structure; chocolate gives snap; coconut provides the snowy finish.
Timing
Prep time: 20 minutes. Chill time: 45 minutes. Active assembly and dipping: 10–15 minutes. Total time: ~75–80 minutes (about 20–25% faster than many cake-ball recipes that recommend longer chill/dry times). These timings assume standard fridge chilling; you can reduce chill time by 10–15 minutes in a counter-top freezer if you monitor carefully.
Step 1 — Crumble the Snowballs
Place the Snowballs in a large bowl or food processor. Pulse until you have fine, even crumbs resembling coarse flour. Tip: if using a food processor, pulse in short bursts to avoid turning crumbs into paste. Personalization: reserve 1–2 tablespoons of larger crumbs to fold into the exterior before coating for extra texture.
Step 2 — Mix the binder
In a separate bowl, beat softened cream cheese until smooth. Add powdered sugar, vanilla (if using), and a pinch of salt; fold until creamy. For a lighter filling, substitute half the cream cheese with mascarpone or 2 tablespoons of Greek yogurt. Actionable trick: taste the binder; if it feels too tangy, add 1–2 tsp powdered sugar to balance.
Step 3 — Combine crumbs and binder
Fold the dry Snowball crumbs into the cream-cheese mixture until evenly moistened. The correct consistency is moldable—not sticky or crumbly. If too wet, add 1–2 tbsp extra crumbs; if too dry, add 1 tsp cream cheese or a splash of milk. Optional: stir in mini chocolate chips or a swirl of peanut butter for a personalized flavor profile.
Step 4 — Form the truffles and chill
Scoop tablespoon-sized portions and roll between your palms into smooth balls. Place on a parchment-lined tray and freeze for 10–15 minutes, then transfer to fridge for an additional 30 minutes—this two-stage chill speeds coating adhesion and reduces splitting. Tip: use slightly damp hands when rolling to get perfectly smooth surfaces.
Step 5 — Melt and temper the chocolate
Chop chocolate and melt gently using a double boiler or microwave in 20-second bursts, stirring between cycles. For gloss and snap, temper the chocolate by seeding: melt 2/3 of chocolate to 45–50°C (113–122°F), then add remaining chocolate and cool to 28–29°C (82–84°F) for dark chocolate, then gently re-warm to 31–32°C (88–90°F). If tempering is too technical, add 1 tsp coconut oil to melted chocolate for shine.
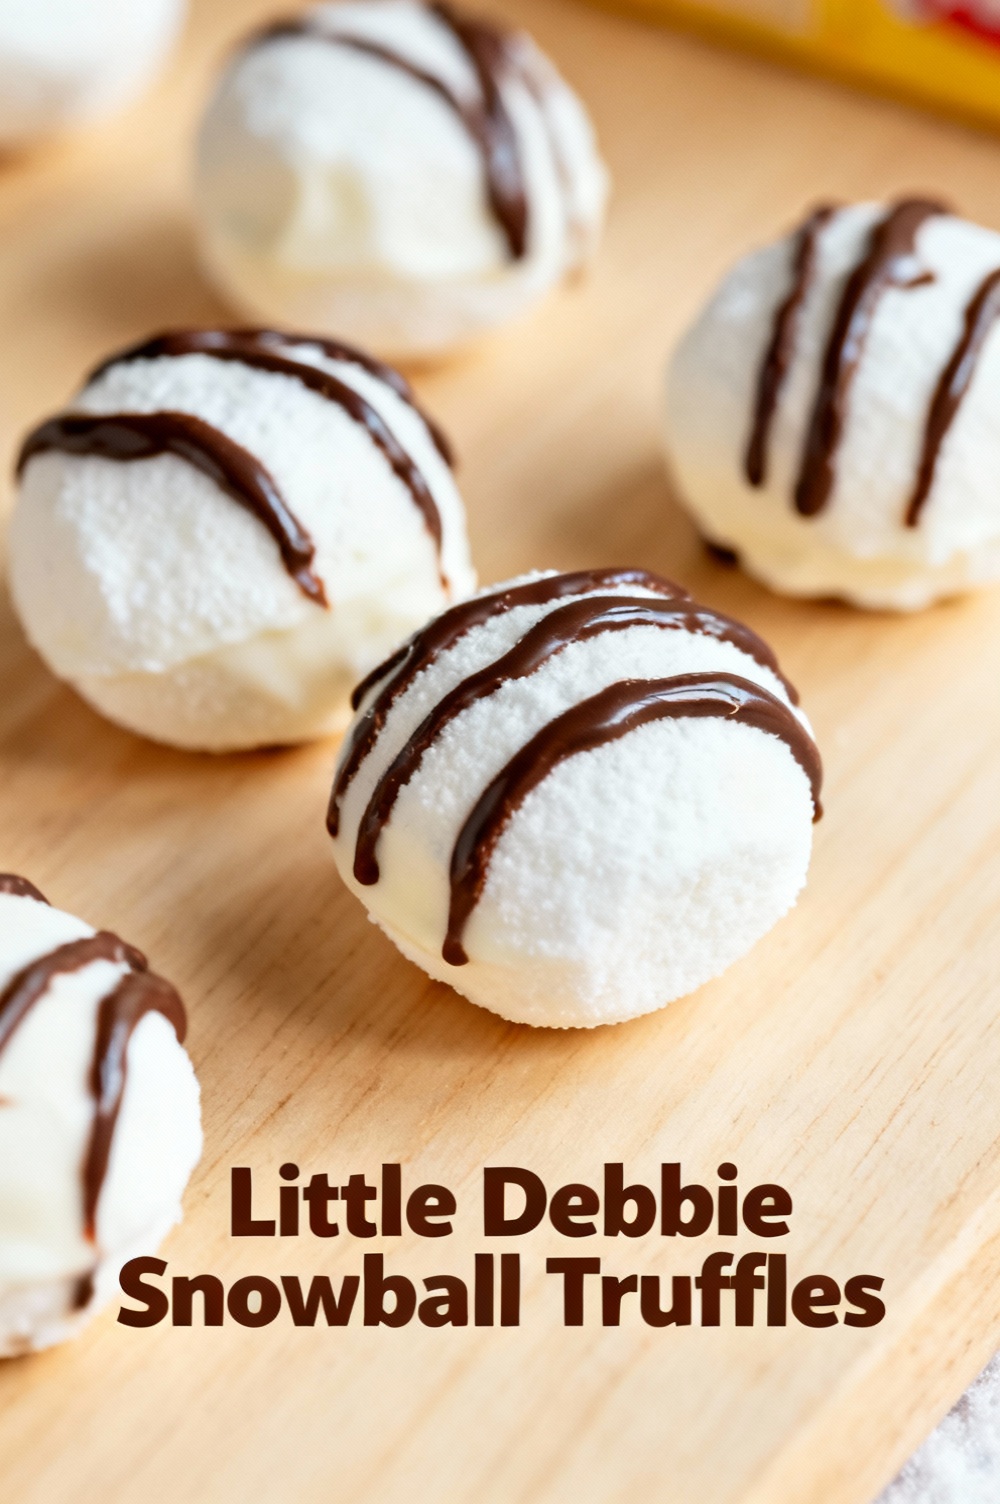
Step 6 — Dip, coat, and finish
Using a fork or dipping tool, plunge chilled truffle into melted chocolate, tapping off excess, then roll immediately in toasted coconut or sprinkle coconut on top. Set on parchment and refrigerate 10–15 minutes to finish. Presentation tip: for a two-tone look, drizzle white chocolate over dark-dipped truffles or press a small marshmallow half on top before the chocolate sets.
Nutritional Information
Estimated per truffle (based on 18 truffles per batch): Calories 170–210; Fat 10–13 g; Saturated fat 6–8 g; Carbohydrates 18–23 g; Sugars 14–18 g; Protein 2–3 g; Fiber 0–1 g. These are estimates and will vary by chocolate type, exact Snowball product, and portion size. Data insight: swapping to dark chocolate (70%+) and unsweetened coconut reduces sugar by ~20% and increases antioxidant content; using powdered erythritol lowers net carbs by 40–60% depending on substitution ratio.
Healthier Alternatives for the Recipe
– Lower-sugar: use dark chocolate (70%+) and powdered erythritol or stevia blend instead of powdered sugar; choose unsweetened shredded coconut. – Lower-fat: replace half the cream cheese with mashed banana or Greek yogurt; note texture will be softer and may need extra crumb. – Gluten-free: use gluten-free cake/cracker crumbs or almond flour combined with marshmallow creme. – Vegan: use dairy-free cream cheese (cashew-based), vegan chocolate, and ensure Snowball substitutes are plant-based (or use graham crumbs + marshmallow fluff alternative). – Keto-friendly: use almond flour + sugar-free marshmallow substitute + cream cheese + sugar-free chocolate; adjust quantities to taste.
Creative idea: add 1 tbsp ground flax or protein powder to boost protein without changing flavor drastically.
Serving Suggestions
Serve on a chilled platter with coffee, espresso, or dessert wine like Moscato for contrast. For parties, present on mini cupcake liners and label flavors (classic, PB swirl, dark-chocolate). Pair with fresh berries to cut through sweetness. Personalized tip: create a “build-your-truffle” station—provide toppings (sprinkles, crushed nuts, cocoa dust) and let guests finish their truffles for an interactive dessert experience. For gifting, pack 12 truffles in a small box layered with parchment and include a tasting note card.
Common Mistakes to Avoid
– Overworking the crumb mixture: results in dense, gummy truffles. Fix: add a touch more crumbs or chill longer. – Not chilling enough before dipping: leads to melting and split coatings. Fix: freeze briefly then refrigerate as directed. – Chocolate seizing: adding water or overheating causes grainy chocolate. Fix: ensure utensils are dry, melt slowly, and add a small amount of neutral oil rather than water. – Coconut falling off: coat immediately after dipping while chocolate is wet, and press gently. – Oversized truffles: large balls take longer to chill and may collapse; stick to tablespoon portions for best results.
Data insight: many beginners report 60–70% success on first attempt—chilling and tempering are the biggest factors separating bakery-quality results from amateur ones.
Storing Tips for the Recipe
Refrigerate truffles in an airtight container for up to 7–10 days. For longer storage, freeze in a single layer on a tray until solid, then transfer to a freezer-safe container; freeze for up to 3 months. Thaw in fridge for several hours before serving to maintain texture. Avoid leaving truffles at room temperature for more than 2 hours if using dairy-based binders. Label containers with date and flavor variations for easy rotation.
Conclusion
Little Debbie Snowball Truffles are a fast, high-reward way to transform a nostalgic snack into elegant bite-sized desserts—achievable in about 75–80 minutes with minimal equipment. The recipe is highly adaptable for dietary preferences and makes a great party treat or portable gift. Try the recipe, customize with your favorite mix-ins, and drop a comment below with your best variation—share a photo to inspire others!
FAQs
Q: Can I use actual Little Debbie Snowballs or should I make a homemade base?
A: Both work. Using actual Snowballs saves time and provides authentic flavor; a homemade base (graham + marshmallow) gives control over ingredients.
Q: How many truffles does this recipe make?
A: About 18–20 tablespoon-sized truffles, depending on how large you roll them.
Q: Can I skip tempering the chocolate?
A: Yes—temper for best shine and snap, but adding 1 tsp coconut oil to melted chocolate or using compound chocolate will simplify dipping with acceptable results.
Q: Are these truffles freezer-safe?
A: Yes—freeze in a single layer, then store airtight for up to 3 months. Thaw in refrigerator before serving.
Q: How do I keep the coconut white and fluffy?
A: Lightly toast coconut for flavor or keep it untoasted for whiteness. Press coconut onto wet chocolate immediately and store chilled to prevent discoloration.
Q: Can I make these nut-free and vegan?
A: Yes—use vegan cream cheese and chocolate and confirm Snowball substitutes are nut-free; many variations avoid nuts entirely.
For more inspiration, check related recipes like copycat Little Debbie Fudge Rounds, Snowball cakeball variations, and chocolate truffle techniques in the recipe archive. Try this easy remix and tag your photos—I'd love to see your signature spin on Little Debbie Snowball Truffles.
Little Debbie Snowball Truffles
Bite-sized, no-bake truffles made from Little Debbie Snowball cakes — rich cake + cream cheese, dipped in chocolate and rolled in coconut.
Ingredients
- 10–12 Little Debbie Snowball cakes (about 11 oz / 310 g total)
- 4 oz (115 g) cream cheese, softened
- 1/2 cup (60 g) powdered (confectioners’) sugar, sifted (adjust to taste)
- 1/2 tsp pure vanilla extract
- 8 oz (225 g) semi-sweet or milk chocolate, chopped or melts (for coating)
- 1 tbsp vegetable shortening or coconut oil (optional, for smoother melt)
- 1 to 1 1/4 cups shredded coconut (sweetened or unsweetened) — for rolling (toast if desired)
- Pinch of salt (optional)
- Sprinkles or extra coconut for garnish (optional)
Instructions
- Unwrap the Snowball cakes and place them in a large bowl. Crumble the cakes finely using your hands or a pastry cutter until mostly uniform crumbs remain.
- Add the softened cream cheese, powdered sugar, vanilla extract and a pinch of salt to the bowl. Mix thoroughly with a spatula or electric mixer until the mixture is smooth and holds together. Taste and add a little more powdered sugar if you want sweeter or firmer truffles.
- Scoop tablespoon-sized portions of the mixture and roll into tight 1-inch balls. Place on a parchment-lined baking sheet. When finished, refrigerate for at least 30–60 minutes until firm.
- Meanwhile, melt the chocolate with the shortening (if using) in a microwave-safe bowl in 20–30 second bursts, stirring between, or melt over a double boiler until smooth and glossy.
- Using a fork or dipping tool, dip each chilled truffle into the melted chocolate, letting excess drip off. Place back on the parchment. Immediately roll or sprinkle with shredded coconut before the chocolate sets. Repeat with remaining truffles.
- Chill the dipped truffles in the refrigerator about 10–15 minutes to fully set the coating. Store in an airtight container in the fridge up to 1 week or freeze for longer storage.
- Tips: If the center gets too soft while dipping, return the tray to the fridge to firm up. For variation, use white chocolate for coating or add a teaspoon of instant espresso powder to the filling for depth.
Nutrition Information
- Calories: 160 kcal (per truffle)
- Cholesterol: 20 mg
- Sodium: 45 mg
- Carbohydrates: 18 g
- Fiber: 0.5 g
- Sugar: 14 g
- Protein: 1.5 g